Paludarium Waterfall Guide
A paludarium waterfall should be constructed as a controlled, serviceable water pathway integrated into the enclosure's hardscape. Use supported foam, slate, egg-crate or hybrid construction to create defined cascades, then control splash with recessed landing zones, side containment and drip edges. Keep pumps, prefilters, tubing and fittings accessible, prevent hidden standing-water cavities, and test the entire feature before planting or adding livestock. Pump sizing and head-loss calculations belong in the paludarium filter and pump guide, while aquatic volume and evaporation-buffer planning belong in the Paludarium Water Volume Calculator.
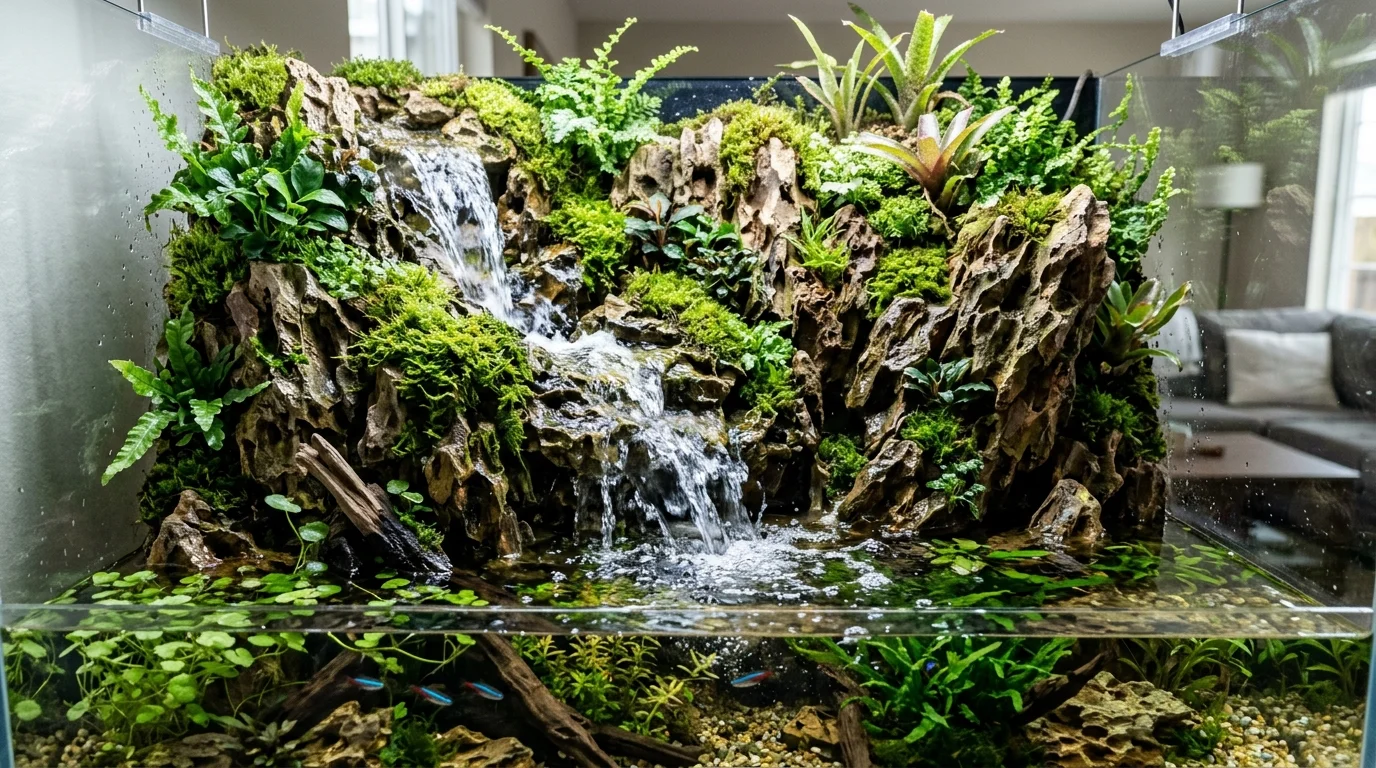
Quick Answer
Build a paludarium waterfall as a controlled water path rather than a decorative wall that happens to receive pump discharge. Create a supported structure, establish a defined upper return point, shape each cascade so water stays on the intended surface, add physical splash control where water leaves the hardscape, provide access to hidden tubing and pump connections, and test the feature before planting or adding livestock. Use the paludarium filter and pump guide for pump sizing, head loss and flow control, and use the Paludarium Water Volume Calculator for aquatic-zone volume and evaporation-buffer planning.
Key Takeaways
- Build the waterfall around a defined water path with supported terraces, sealed transitions and controlled return points rather than relying on surface texture alone.
- Use physical splash barriers, drip edges and recessed landing zones to keep falling water inside the intended aquatic footprint.
- Never permanently bury tubing, fittings or pump connections behind foam; provide removable access so clogs and leaks can be serviced.
- Treat heat, splash and increased surface agitation as evaporation drivers and maintain enough water reserve above the pump-safe minimum.
How Does a Paludarium Waterfall Work?
A paludarium waterfall moves water from the aquatic reservoir to an elevated return point and then guides it down a deliberately shaped hardscape path. The construction challenge is not simply making water fall. It is keeping the flow on the intended route, preventing uncontrolled splash, protecting hidden plumbing, limiting noise and making the entire feature accessible for maintenance.
The waterfall should therefore be treated as a small hydraulic feature integrated into the enclosure's structural hardscape. The pump and its hydraulic sizing are deliberately outside this guide. For pump selection, operating head, delivered flow and discharge-side flow control, use the paludarium filter and pump guide.
For the overall enclosure construction sequence, use the step-by-step paludarium building guide.
Plan the Waterfall Before Building the Hardscape
Start with the complete water path rather than adding a waterfall after the terrain has already been fixed. Identify the reservoir, pump chamber, hidden return line, highest discharge point, cascade surfaces, splash zones and final return to the aquatic basin.
- Mark the aquatic reservoir and maximum water level.
- Choose the elevated waterfall discharge point.
- Route the return tubing before permanently closing the hardscape.
- Build the structural support for terraces and ledges.
- Create a continuous waterproof flow path.
- Add splash-control features at drop points and landing zones.
- Create access points for tubing, fittings and pump maintenance.
- Run the waterfall with plain water before installing sensitive plants or livestock.
Reservoir
↓
Pump chamber
↓
Hidden return tubing
↓
Upper discharge point
↓
Terrace 1 → Terrace 2 → Terrace 3
↓
Controlled splash zone
↓
Aquatic reservoir
Choose the Waterfall Construction Method
Most paludarium waterfalls combine structural support with a waterproof surface layer. Expanding polyurethane foam is useful for shaping irregular terrain, while slate and other hardscape materials can create durable exposed water-contact surfaces. Egg-crate or light diffuser grid can provide a framework for large elevated structures without forcing the entire feature to be solid.
| Construction Method | Main Strength | Main Limitation | Best Use |
|---|---|---|---|
| Expanding foam | Easy shaping and low structural mass | Requires proper sealing and reinforcement where needed | Organic waterfall walls and irregular cascades |
| Slate tiers | Defined durable water path | Weight and sharp edges require careful support | Flat ledges and stepped cascades |
| Egg-crate framework | Lightweight structural skeleton | Must be properly supported and covered | Large elevated landforms and waterfall cores |
| Foam plus stone | Combines shaping with durable exposed surfaces | More construction and sealing work | Natural-looking structured cascades |
Expanding Foam Waterfall Construction
Expanding foam is best viewed as a sculptural construction material rather than the final water-contact surface. Build the desired terrain, allow the foam to cure according to the product instructions, then trim and seal the exposed structure with materials appropriate for permanent water contact.
Do not create a completely inaccessible foam block around every tube and fitting. Foam should hold the terrain in place while the plumbing remains serviceable.
When using foam to create a waterfall, deliberately sculpt:
- Upper catch areas that receive the return flow.
- Defined channels that prevent water from finding unintended routes.
- Terrace lips that determine where water leaves one level.
- Recesses that reduce uncontrolled outward splash.
- Drip edges where water must be prevented from tracking behind the visible surface.
- Maintenance openings around plumbing and service components.
Slate vs Expanding Foam for a Paludarium Waterfall
Slate and expanding foam solve different construction problems. Slate is useful when the builder wants predictable flat ledges, durable exposed surfaces and clearly defined drop points. Foam is useful for creating lightweight irregular terrain and supporting a naturalistic waterfall wall.
A hybrid construction is often the most controllable approach: use an egg-crate or foam structure for the landform, then use slate or other suitable hardscape at selected water-contact points where a predictable cascade is desired.
| Feature | Slate | Expanding Foam |
|---|---|---|
| Water path | Highly predictable on flat surfaces | Depends on sculpting and final surface treatment |
| Structural mass | Relatively heavy | Lightweight |
| Natural irregular terrain | Requires stacking and shaping | Easy to sculpt |
| Service integration | Can leave deliberate cavities | Must avoid permanently encapsulating plumbing |
| Best role | Terraces, lips and visible cascade surfaces | Terrain core and shaped waterfall wall |
Build a Stable Waterfall Support Structure
Waterfall hardscape becomes heavier when stone, substrate and water are added. Elevated slate tiers should therefore be mechanically supported rather than relying entirely on cured foam adhesion.
Egg-crate grid can be used as a lightweight framework beneath large terrain sections. Support columns, braces or attachment points should transfer the load to the enclosure base rather than allowing a large cantilevered mass to depend on one foam bond.
Before covering the structure, apply a physical load test appropriate to the enclosure. Check that terraces do not flex, shift or rotate when the intended hardscape and wet substrate are installed.
| Structural Area | Required Check | Failure Risk |
|---|---|---|
| Upper waterfall ledge | Supported against rotation and downward movement | Collapsed cascade or damaged plumbing |
| Slate terrace | Supported along its load-bearing edges | Cracked glass, shifted stone or unstable water path |
| Egg-crate framework | Connected to stable supports | Flexing or settlement |
| Foam terrain | Fully cured and mechanically stable | Movement or separation of finished surfaces |
| Plumbing route | Protected from compression and sharp edges | Restricted flow or hidden leak |
How to Create a Controlled Cascading Flow Path
A waterfall should have intentional transitions between levels. A flat shelf can produce a sheet of water, while a narrow channel can create a concentrated stream. The choice should be made during construction because changing the geometry later may require removing sealed hardscape.
Give each cascade a defined landing surface before the next drop. Avoid allowing water to leave a terrace from several uncontrolled edges. A single predictable exit makes splash management and cleaning much easier.
Upper return
↓
[Catch shelf]
↓
[Defined lip]
→ controlled sheet
↓
[Landing pool]
↓
[Lower channel]
↓
Reservoir| Flow Geometry | Result | Control Measure |
|---|---|---|
| Wide flat shelf | Broad sheet of water | Use a continuous lip and contained landing area |
| Narrow channel | Concentrated stream | Seal channel edges and prevent bypass flow |
| Stepped ledges | Multiple small drops | Give each step a defined landing surface |
| Large vertical drop | Higher splash and noise potential | Use a recessed landing pool or splash barrier |
| Irregular rock face | Diffuse multi-path flow | Test and seal unintended escape routes |
How to Stop a Paludarium Waterfall From Splashing
Splash is normally controlled by changing the geometry of the drop rather than simply reducing pump output. Use recessed landing pools, lower drop heights, overhanging lips, side walls, splash guards and absorbent or textured landing surfaces where appropriate.
Keep the falling stream away from exposed electrical equipment, open substrate edges and enclosure ventilation openings. Water that repeatedly hits a vertical wall can also produce fine droplets that travel farther than the main stream.
If the desired flow is still too aggressive after the physical path has been corrected, use the flow-control provisions of the pump system. Do not duplicate pump-sizing calculations here; the filter and pump guide covers delivered flow, tubing and discharge-side control.
| Splash Source | Construction Fix | Why It Works |
|---|---|---|
| High vertical drop | Reduce drop height or add an intermediate shelf | Reduces impact energy and uncontrolled rebound |
| Open landing pool | Recess the pool and add side containment | Keeps impact inside the intended zone |
| Water leaving terrace sides | Add raised side walls or sealed edges | Prevents lateral escape |
| Stream striking a vertical wall | Change angle or add a sloped landing surface | Reduces outward spray |
| Excessive delivered flow | Use appropriate discharge-side flow control | Reduces water velocity without altering the construction geometry |
Build Splash Guards and Drip Edges
Small geometric details often prevent more water damage than a large decorative barrier. A raised side edge can stop lateral escape from a terrace, while a drip edge can force water to leave a surface at the intended location instead of tracking underneath the next hardscape layer.
Inspect every transition where water could migrate behind the visible waterfall. Hidden bypass paths are particularly difficult to diagnose because the front of the waterfall can appear to operate normally while water slowly accumulates behind the structure.
Acoustic Dampening for Waterfalls
Waterfall noise is primarily created by water impact, air entrainment, vibration and resonance from the enclosure or hardscape. The quietest waterfall is not necessarily the one with the lowest flow. It is the one where the flow path minimizes uncontrolled impact and vibration.
Reduce noise by using shorter drops, submerged or partially recessed landing points, broad thin sheets instead of uncontrolled jets, and mechanically stable hardscape. A thin vibration-isolating layer can also reduce direct transmission between a pump or hardscape component and the enclosure structure when the material is suitable for the environment.
| Noise Source | Typical Cause | Construction Response |
|---|---|---|
| Impact noise | Water falling onto exposed stone or glass | Reduce drop height or use a recessed landing |
| Jet noise | Concentrated high-velocity discharge | Use a controlled outlet and appropriate flow |
| Vibration | Pump or hardscape touching enclosure surfaces | Stabilize components and isolate vibration where appropriate |
| Resonance | Hollow structures amplifying water impact | Add stable mass or suitable dampening to the structure |
| Air entrainment | Water repeatedly plunging through air | Use shorter drops and controlled landing zones |
Prevent Hidden Tubing Clogs and Make Plumbing Serviceable
Waterfall plumbing should be designed for removal before the hardscape is permanently finished. Tubing can accumulate biological debris, mineral deposits or plant material, while intake prefilters can clog faster than the return line.
Do not permanently foam or silicone a pump, prefilter, union, valve or critical tubing connection into an inaccessible cavity. Instead, create a removable hatch, access shaft or lift-out panel large enough to remove the component that actually needs service.
Visible waterfall surface
↓
Removable access panel
↓
Return tubing + connection
↓
Pump chamber
↓
Serviceable intake/pre-filter| Component | Access Requirement | Maintenance Task |
|---|---|---|
| Pump | Removable without dismantling waterfall | Impeller cleaning and replacement |
| Prefilter | Direct or near-direct access | Debris removal and rinsing |
| Return tubing | Pull-through or detachable connection | Flush and inspect for blockage |
| Outlet fitting | Accessible connection | Clear deposits and adjust outlet |
| Hidden junction | Inspection access | Detect leaks or loose connections |
How to Prevent Mold Behind a Paludarium Waterfall
Mold or persistent microbial growth behind a waterfall is usually a moisture-management and access problem rather than simply a problem with the visible waterfall surface. A permanently wet cavity with trapped organic debris and little air exchange can become difficult to inspect and clean.
Keep the waterfall structure sealed where water is intended to travel and avoid creating unplanned dead cavities behind it. If a cavity is unavoidable, make it inspectable and ensure that water cannot accumulate there indefinitely.
Use removable hardscape panels or access hatches where practical. During maintenance, inspect behind the waterfall for persistent moisture, organic debris, leaks and blocked drainage. Do not seal over an unexplained wet area simply because the visible front surface looks normal.
| Hidden Moisture Problem | Likely Construction Cause | Correction |
|---|---|---|
| Water behind waterfall wall | Unsealed edge or bypass path | Identify the route and reseal the intended flow path |
| Standing water in cavity | Dead space with no drainage | Eliminate cavity or provide controlled drainage and access |
| Organic debris accumulation | Inaccessible recess | Create service access and clean periodically |
| Persistent condensation | Warm wet cavity with limited ventilation | Improve inspection, drainage and appropriate ventilation |
| Repeated wet substrate | Splash escaping the intended channel | Add physical splash containment |
Waterfall Splash and Evaporation
A waterfall increases the air-water interface compared with a calm reservoir. Falling water, thin sheets and surface agitation can therefore increase evaporation. Lighting heat can compound the effect, particularly in a small enclosure.
Do not treat the waterfall's reservoir volume as the same thing as its pump-safe operating reserve. A shallow basin may contain enough water by total volume but still expose the intake after a relatively small level drop.
Use the Paludarium Water Volume Calculator to establish the aquatic-zone volume and plan the available reserve. The paludarium filter and pump guide covers minimum pump-safe levels and intake protection.
Evaporation buffer (L)
= A × D
A = exposed water surface area in m²
D = allowable water-level drop in mm
1 m² × 1 mm = 1 L
For example, an exposed water surface of 0.20 m² and an allowable 15 mm water-level drop correspond to approximately 3 L of evaporation buffer:
0.20 × 15 = 3 LThis is a water-volume calculation, not a daily evaporation prediction. Measure actual water loss after the waterfall and lighting have reached normal operating conditions.
Waterfall Maintenance Access
The splash zone should be treated as a maintenance zone. Moss, algae, mineral deposits and plant debris can accumulate where water repeatedly lands. If the only way to clean the splash zone is to remove the waterfall wall, the feature is not serviceable enough for long-term use.
- Keep the primary landing zone visible where possible.
- Provide a removable panel for hidden plumbing.
- Leave enough clearance to remove the prefilter and pump.
- Make outlet fittings accessible for inspection.
- Keep splash-sensitive electrical connections outside the likely spray envelope.
- Inspect hidden cavities for standing water or organic debris.
- Clean mineral deposits before they materially change the flow path.
Waterfall Testing Before Planting
Run the completed waterfall with plain water before installing sensitive plants or livestock. The objective is to discover leaks, bypass flow, splash, unstable hardscape, excessive noise and service-access problems while the structure is still easy to modify.
| Test | Pass Condition | Failure Response |
|---|---|---|
| Flow-path test | Water follows the intended cascade | Reshape or seal unintended channels |
| Splash test | No persistent water reaches unsafe areas | Add splash containment or change geometry |
| Leak test | No water appears behind intended waterproof surfaces | Locate and repair the bypass path |
| Structural test | Terraces remain stable during operation | Improve mechanical support |
| Noise test | Sound remains acceptable at normal operation | Reduce impact, vibration or uncontrolled jetting |
| Restart test | Waterfall resumes normally after power interruption | Inspect outlet, intake and plumbing arrangement |
| Service test | Pump, prefilter and plumbing can be removed | Increase access opening before final closure |
Waterfall Construction Checklist
- Define the complete reservoir-to-return water path.
- Choose the upper discharge location.
- Route and protect return tubing before closing the hardscape.
- Provide mechanical support for elevated stone and terraces.
- Shape each cascade with a defined landing and exit.
- Seal unintended bypass routes.
- Add drip edges and splash containment where required.
- Keep hidden pump and tubing components serviceable.
- Plan access to prefilters, fittings and tubing.
- Check hidden cavities for standing water.
- Run the feature before planting or adding livestock.
- Measure evaporation after lighting and waterfall operation stabilize.
- Confirm adequate water reserve above the minimum pump-safe level.
Reference Table: Waterfall Construction Decision Framework
| Stage | Decision | Required Result |
|---|---|---|
| 1 | Map water path | Defined reservoir-to-return route |
| 2 | Select structure | Foam, slate, egg-crate or hybrid construction |
| 3 | Support hardscape | Stable terraces and ledges |
| 4 | Shape cascades | Predictable landing and exit points |
| 5 | Control splash | Contained spray and drip paths |
| 6 | Provide service access | Removable pump and plumbing components |
| 7 | Test | Stable, leak-free and serviceable waterfall |
Final Paludarium Waterfall Rule
A durable paludarium waterfall is a controlled water pathway integrated into a serviceable structural system. Build the support first, shape the water path deliberately, contain every major splash zone, dampen impact where necessary and keep pumps, prefilters and hidden tubing accessible. Leave pump sizing and hydraulic head calculations to the filter and pump guide, and use the Paludarium Water Volume Calculator when planning the aquatic reserve and evaporation buffer.
Frequently Asked Questions
How do I stop a paludarium waterfall from splashing everywhere?
Control the geometry first: reduce excessive drop height, use recessed landing pools, add raised side walls, create drip edges and keep falling water on defined surfaces. If delivered flow remains excessive after the construction path is corrected, use appropriate discharge-side flow control from the pump system rather than duplicating pump-sizing calculations in the waterfall design.
How do I prevent hidden waterfall tubing from clogging?
Keep the pump, prefilter, return tubing and critical fittings removable through an access shaft, hatch or lift-out panel. Do not permanently foam or silicone service components into the false bottom. Design enough clearance to remove the pump and prefilter without dismantling the waterfall.
Is slate or expanding foam better for a paludarium waterfall?
Slate provides predictable flat ledges and durable exposed water-contact surfaces, while expanding foam provides lightweight sculptable terrain. A hybrid design can use supported foam or egg-crate for the terrain core and slate at selected cascade surfaces. Elevated slate must have mechanical support rather than depending entirely on foam adhesion.
How can I make a paludarium waterfall quieter?
Reduce uncontrolled impact rather than simply trying to eliminate flow. Use shorter drops, recessed landing areas, broad controlled sheets, mechanically stable hardscape and appropriate vibration isolation. Concentrated jets and water striking glass or hollow structures tend to create more impact and resonance.
How do I prevent mold behind a paludarium waterfall?
Avoid sealed dead cavities where water can accumulate. Seal unintended bypass routes, provide drainage where a cavity is unavoidable, keep hidden areas inspectable and create service access for cleaning. Persistent moisture behind the waterfall should be investigated rather than simply covered with another layer of foam or sealant.
Explore More
Related Articles
Related Plant Guides
No specific plant guides found matching this topic.
Recommended next actions
Continue Exploring
Dive deeper into related plant care tools and profiles.
Topic Guide
What Is a Paludarium? Design, Anatomy, and Ecosystem Setup
Learn what a paludarium is, how land and water zones work together, and how to plan drainage, circulation, substrate, planting, and maintenance.
Topic Guide
Paludarium Water Volume: Calculating Your Usable Aquatic Space
A guide to determining the true usable water volume in a paludarium setup, with worked examples, displacement estimates, and equipment sizing.
Topic Guide
Paludarium Filter and Pump Guide
A practical hydraulic and equipment guide for sizing paludarium pumps and filtration around net water volume, operating head, plumbing resistance, shallow-water intake geometry, flow control, evaporation, heating, biological media, canister filters, and serviceability.
Topic Guide
Paludarium Plants: Choosing Plants for Land & Water Zones
Learn how to choose paludarium plants by land, emergent, humid, and aquatic zones, with guidance on light, moisture, growth, and maintenance.
Topic Guide
Paludarium Moss: How to Attach, Hydrate, and Maintain Moss
A technical guide to using moss across terrestrial, splash, transition, and submerged paludarium zones, covering attachment mechanics, hydration, PAR, airflow, algae control, and maintenance.
Topic Guide
Water Quality for Houseplants
Compare tap, filtered, distilled, and rainwater for houseplants. Learn which water is best for sensitive plants and how to prevent mineral buildup.