Converting Houseplants to Semi-Hydro: Root Transition & Rot Prevention
Soil roots and water roots are structurally different, which is why a plant moved from soil to a permanent reservoir often loses its old roots before growing new ones that handle constant moisture and low oxygen. Success depends on removing nearly all organic matter, which would rot in a reservoir, and on matching the transition pathway to the plant's sensitivity. This guide compares soil and water root anatomy, gives the root-stripping and peroxide bath protocol, and sets out three pathways: dry-start in Pon, water pre-rooting and the sphagnum stepping stone. It also covers the 2-4 week critical window, humidity, the zero-fertilizer rule, seasonal timing and troubleshooting. Use it with the Pon guide, the DIY Pon recipe and the fertilizer dosing guide.
Quick Answer
To convert a soil houseplant to semi-hydro, remove 95-100% of the soil under lukewarm running water, trim dead or mushy roots, and optionally soak the roots for 15 minutes in 3% hydrogen peroxide diluted 1:4 with water. Then choose a pathway: a dry-start in damp Pon with no standing reservoir for 10-14 days, pre-rooting in oxygenated water until 3-5 cm white roots form, or a long-fibre sphagnum stepping stone for delicate plants. Use plain RO or low-TDS water with no fertilizer, keep humidity at 60-80%, and expect 2-4 weeks of transition with some lower leaf loss.
Key Takeaways
- Soil roots are adapted to air-filled soil pores and often die back in a reservoir, while water roots form new aerenchyma (gas-filled tissue), so expect old roots to be replaced over 2-4 weeks.
- Remove 95-100% of the soil and organic matter with lukewarm water and a soft brush, because leftover peat or bark feeds bacteria and causes rot in the reservoir.
- Pick the pathway by plant sensitivity: dry-start in Pon for vigorous aroids and cuttings, water pre-rooting for plants that need visible root progress, and a long-fibre sphagnum stepping stone for delicate or expensive plants such as Alocasia, Anthurium, Calathea and ferns.
- Do not fertilize until new white roots are established, usually 3-4 weeks, and use plain RO or low-TDS water until then, because fertilizer salts burn tender new root tips.
- Convert in the active growing season, keep humidity at 60-80% and light bright but indirect, and expect lower leaves to yellow as the plant redirects nitrogen to new growth.
Why Conversion Needs a Plan
Moving a plant from soil to semi-hydroponics is not just a change of pot. The roots a plant grew in soil are built for air-filled pores, and many of them die back when they meet a permanent reservoir. The plant survives by growing a second set of roots adapted to wet, low-oxygen conditions. Your job is to keep it hydrated, clean and low-stress while that happens. Before you start, read the semi-hydroponics with Pon guide for how the finished system works, and prepare the medium using the DIY Pon recipe or a commercial Pon. For the choice between materials, see LECA vs Pon.
Soil Roots vs Water Roots
Soil roots and water roots differ in structure, which explains the die-back you should expect.
- Soil roots have thicker protective outer layers, with cutin, lignin or suberin deposits, and dense root hairs that absorb water held under tension in soil pores. Oxygen reaches them by diffusion through air-filled soil spaces. In stagnant water they run out of oxygen quickly and rot.
- Water roots are adventitious roots that form in response to wet conditions. They have thinner outer layers and more aerenchyma, which is tissue with gas-filled spaces that carries oxygen internally from the stem to the root. This lets them live in a wetter zone, as long as the water is clean and they have an air gap above it.
The second table above sets out these differences. The practical lesson is that old soil roots are not going to adapt, so do not judge success by whether they survive. Judge it by whether new white roots appear.
Choose the Right Moment
Convert during the active growing season, which for most houseplants means spring through early autumn, when the plant has the energy to make new roots. A healthy plant with several leaves and some firm roots has the best odds. Avoid converting a plant that is already stressed by pests, root rot or recent repotting unless you are rescuing it, and avoid conversion in deep winter unless you can provide steady warmth and bright light. Aim for a root-zone temperature of about 20-27 °C (68-80 °F).
The Root-Stripping Protocol
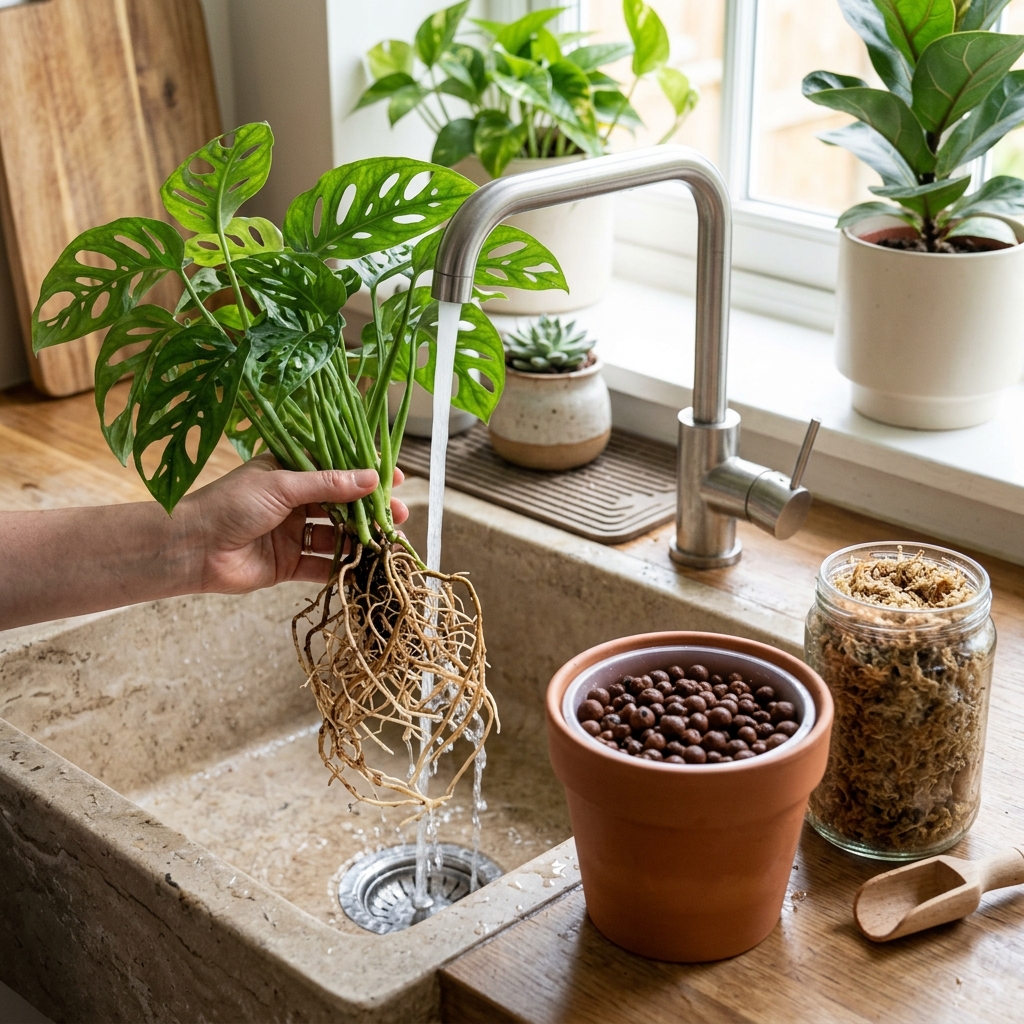
The most important step is getting the roots clean. Any peat, bark or coir left behind will decompose in the reservoir, feed bacteria and cause rot. Remove 95-100% of the organic matter.
- Loosen the root ball. Gently pull the plant from its pot and shake off dry soil over a bin or newspaper.
- Rinse with lukewarm water. Hold the roots under a gentle stream of lukewarm water, or swish them in a bucket. Cold water can shock roots and hot water can scald them.
- Brush and tease. Use a soft paintbrush or your fingers to work soil from between roots, around the crown and from the base of the stem. Be patient, since small clumps of peat hide in crevices.
- Inspect and trim. Cut off any black, brown, slimy or hollow roots with clean, sterilized scissors. Keep firm, light-coloured roots, even if they are few. Remove the roots that are dead, but do not strip a healthy plant of every root unless the roots are rotten.
- Check the stem base. If the crown or stem base is soft, cut back to firm, healthy tissue and let the cut dry for a few hours.
Roots that have been bound in dense, peaty soil are the hardest to clean. Soak them in lukewarm water for 20-30 minutes first so that the soil loosens, then rinse again.
Optional Hydrogen Peroxide Bath
Many growers disinfect cleaned roots with a short peroxide bath to reduce bacteria and fungal spores. Dilute standard 3% hydrogen peroxide (H2O2) with water at about 1 part peroxide to 4 parts water and soak the roots for 15 minutes. Do not submerge the leaves or growing point, and rinse the roots in clean water afterwards. The bath is a hobby practice that is mainly useful for damaged or suspect roots; it is not a substitute for thorough cleaning, and a stronger solution or longer soak can burn healthy root tips. Use a fresh bottle, since old peroxide loses strength. Keep it away from your eyes and wash your hands afterwards.
Three Transition Pathways
The first table above compares the methods. Pick one based on how sensitive the plant is.
Method A: Direct-to-Pon Dry-Start
This is the simplest route for hardy plants such as Monstera deliciosa, Philodendron and Pothos.
- Soak the Pon in plain water, drain it, and fill the pot with damp (not dripping) Pon, setting the roots among the grains.
- Leave the reservoir empty for 10-14 days. Roots draw on the moisture held in the Pon.
- Top-water with plain, lukewarm RO or low-TDS water whenever the Pon approaches dryness, so that it stays damp but never soggy.
- When white roots appear, fill the reservoir gradually to 1/4 of the pot height, and then to the recommended level in the Pon guide.
The dry-start gives roots air and encourages them to search for water, which helps them form water roots without the risk of sitting in a reservoir too early.
Method B: Water-Method Pre-Rooting
Hold the bare-root plant in a jar or tub of clean water, with only the roots and the lowest part of the stem submerged, until white adventitious roots reach 3-5 cm. Change the water every 2-3 days and, if possible, add an air stone or use a bubbling cloner to oxygenate it. Keep the water cool to lukewarm and out of direct sun. This method is useful for cuttings, rescue cases and plants with few healthy roots, because you can see the roots forming. Transfer the plant to damp Pon once the roots are 3-5 cm long. Roots grown in plain water are fragile, so plant gently and use a dry-start period of a few days if the Pon is much drier than the water.
Method C: Long-Fibre Sphagnum Stepping Stone
For delicate or expensive plants, such as Alocasia, Anthurium, Calathea and ferns, use damp long-fibre sphagnum moss as an intermediate medium. Pack the moss loosely around the cleaned roots in a pot or clear container, keep it evenly damp like a wrung-out sponge, and maintain humidity. The moss holds moisture but still lets air reach the roots, so roots acclimate to a wet medium gradually. When roots reach 3-5 cm and the plant is growing, shake or rinse off most of the moss and move the plant into Pon. Keep the moss from becoming soggy, and replace it if it turns slimy or sour.
The Critical 2-4 Week Window
The transition phase is when most plants struggle. Know what to expect so that you do not panic.
- Lower leaves yellow and drop. The plant remobilizes nitrogen and other mobile nutrients from older leaves to support new root growth. Losing one to a few of the oldest leaves is normal. Remove them once they are fully yellow.
- Growth pauses. Expect little new leaf growth for 2-4 weeks while roots rebuild.
- Keep humidity at 60-80%. With fewer working roots, a plant cannot replace the water it loses through its leaves, so higher ambient humidity reduces transpirational stress. A clear bag or a humidity dome helps for delicate plants, provided you vent it daily. See the humidity guide for ways to raise humidity.
- Provide bright, indirect light. Avoid direct midday sun, which dries leaves quickly. Steady light supports root growth without scorching.
- Keep the roots in the dark. Use an opaque pot or sleeve to limit algae.
The Zero-Fertilizer Rule
Do not feed during the first weeks of conversion. Fertilizer salts raise the concentration of the water around the roots and burn the tender new root tips that the plant is trying to grow. Use plain RO, rainwater or low-TDS water until you see well-developed white roots and new leaf growth, usually 3-4 weeks. Then introduce a very dilute fertilizer following the semi-hydro fertilizer dosing guide. If you use a Pon with controlled-release fertilizer mixed in, expect the plant to receive some nutrients early, so choose an unfertilized mix for sensitive plants.
After the Transition
Once new roots reach the reservoir, set the water level to 1/4 to 1/3 of the pot height, with the stem and crown clear of water. Replace the reservoir water every 1-2 weeks and flush the Pon from the top monthly. To work out the amount of Pon and size the reservoir for a pot, use the semi-hydro Pon calculator.
Plants That Need Extra Care
- Calathea, Maranta and ferns. Fine, sensitive roots and a strong preference for soft water. Use the sphagnum method, RO or rainwater and high humidity, and keep the reservoir shallow.
- Alocasia and Anthurium. Prone to rot if kept too wet and sensitive to salts. Use the sphagnum method, keep the reservoir at the lower end of the range and flush regularly.
- Hoya and orchids. Thick roots that dislike constant wetness. Use dry-start, a shallow reservoir and a day of dryness between refills.
- Succulents and cacti. Generally poor candidates for a permanent reservoir.
Troubleshooting Summary
| Symptom | Likely cause | Quick fix |
|---|---|---|
| Lower leaves yellow and drop | Normal nitrogen remobilization during conversion | Remove fully yellow leaves, keep humidity at 60-80% and wait for new roots |
| Mushy, brown roots with a sour smell | Soil residue, stagnant water or reservoir too deep | Re-wash, trim rot, do a peroxide bath, restart with a dry-start |
| Whole plant wilts | Few working roots and low humidity | Raise humidity, use a dome and keep the Pon damp |
| Brown root tips on new roots | Fertilizer or high-TDS water too early | Flush with plain water and stop feeding |
| Fungus gnats after conversion | Soil left on the roots | Rinse the roots again and remove any organic debris |
Related Resources
See the complete system in the semi-hydroponics with Pon guide, mix your own substrate with the DIY Pon recipe, compare materials in LECA vs Pon, set a feeding plan with the fertilizer dosing guide, plan quantities with the semi-hydro Pon calculator, raise moisture in the air with the humidity guide, and start with a forgiving plant such as Monstera deliciosa.
Frequently Asked Questions
Is it better to convert to semi-hydro in winter or spring?
Spring through early autumn is better, because plants are actively growing and can make new roots quickly. Winter conversion is possible if you can provide steady warmth (about 20-27 °C at the roots), bright light and higher humidity, but root growth is slower and the risk of rot is higher. If you must convert in winter, choose a hardy plant and use the dry-start method.
Should I cut off all the soil roots when converting?
No. Remove only roots that are dead, black, mushy or hollow. Healthy, firm soil roots may survive for a while and help the plant take up water while new roots form, although many will eventually die back. Cutting off all healthy roots makes the plant struggle unnecessarily, unless you are rescuing a rotten plant.
Is a hydrogen peroxide bath safe for roots?
A short bath is widely used and generally safe when it is diluted. Mix 3% hydrogen peroxide with water at about 1 part to 4 parts, soak the roots for 15 minutes, keep the leaves out of it and rinse afterwards. Stronger mixtures or longer soaks can burn healthy root tips. It is optional and does not replace thorough cleaning.
How should I convert delicate plants such as Calathea and ferns?
Use the long-fibre sphagnum stepping stone, soft or RO water, high humidity and a shallow reservoir. Keep the moss damp but not packed, and move to Pon only when roots reach 3-5 cm. Some of these plants never take to a permanent reservoir well, so watch for browning leaf edges and be ready to return them to moss or soil.
Why are my lower leaves turning yellow after conversion?
It is usually normal. The plant moves nitrogen and other mobile nutrients out of its oldest leaves to fuel new root growth. Losing a few lower leaves in the first 2-4 weeks is expected. If many leaves yellow at once, or the stem is soft, look for rot, low humidity or too much water around the roots.
Do I need to remove every bit of soil?
Aim for 95-100%. Peat, bark and coir decompose in a reservoir and feed bacteria, which can cause rot and attract fungus gnats. A few tiny crumbs are not usually a problem, but visible clumps should be rinsed or brushed away. Sphagnum is more forgiving of small remnants than a water reservoir is.
How long does it take for water roots to form?
Usually 2-4 weeks for the first white roots, and 3-6 weeks for a full set, depending on the species, temperature and light. Aroids such as Monstera and Pothos are typically fast, while Alocasia, Anthurium and Hoya take longer.
When can I start fertilizing a converted plant?
Wait until you see well-developed white roots and new leaf growth, usually 3-4 weeks. Until then use plain RO or low-TDS water. When you start, use a very dilute solution and follow the fertilizer dosing guide, because fertilizer salts burn new root tips.
Should I start with a dry-start or fill the reservoir immediately?
A dry-start of 10-14 days is the safer default for most plants, because it encourages roots to form without risking rot. Filling the reservoir immediately can work for vigorous aroids and cuttings with healthy roots, but it increases the risk for thick-rooted or sensitive plants.
What humidity do plants need during conversion?
Aim for 60-80% around the plant. With fewer functioning roots, the plant cannot replace water lost through its leaves as quickly, and higher humidity reduces that stress. A humidifier, a pebble tray or a ventilated clear cover can help, but vent any enclosure daily to prevent mold.
Sources & References
-
Source: extension.psu.edu
Type: horticultural-reference
-
Source: edis.ifas.ufl.edu
Type: horticultural-reference
-
Source: rhs.org.uk
Type: horticultural-reference
Explore More
Related Articles
Related Plant Guides
Recommended next actions
Continue Exploring
Dive deeper into related plant care tools and profiles.
Calculator
Semi-Hydro Pon Volume & Mineral Split Calculator
Calculate net Pon volume, root displacement, DIY mineral components (pumice, zeolite, lava rock), dry weight, and water reservoir depth in metric or imperial units.
Plant Guide
Swiss Cheese Plant
Expert care guide and diagnostic data for the Swiss Cheese Plant. Learn how to properly water, light, and troubleshoot common issues.
Topic Guide
DIY Pon Recipe: Mineral Ratios, Particle Sizing & Preparation
Make your own DIY mineral Pon substrate: exact pumice, zeolite, and lava rock ratios, mineral particle sizing (3-6 mm), rinsing, and fertilizer dosing.
Topic Guide
Humidity
Learn everything about humidity for your indoor and aquarium plants. Expert care tips, troubleshooting, and related guides.
Topic Guide
LECA vs Pon: Semi-Hydroponic Substrates Compared
LECA vs Pon comparison: capillary wicking height, root stability, pH buffering, particle size, cleaning reuse, and which plants prefer each medium.
Topic Guide
Semi-Hydro Fertilizer Dosing: EC Targets, Nutrients & Salt Flushing
Master fertilizer dosing in semi-hydroponics: EC and PPM targets by plant family, hydroponic vs standard fertilizer, flushing salt buildup, and foliar feeding.