Paludarium Lighting Guide
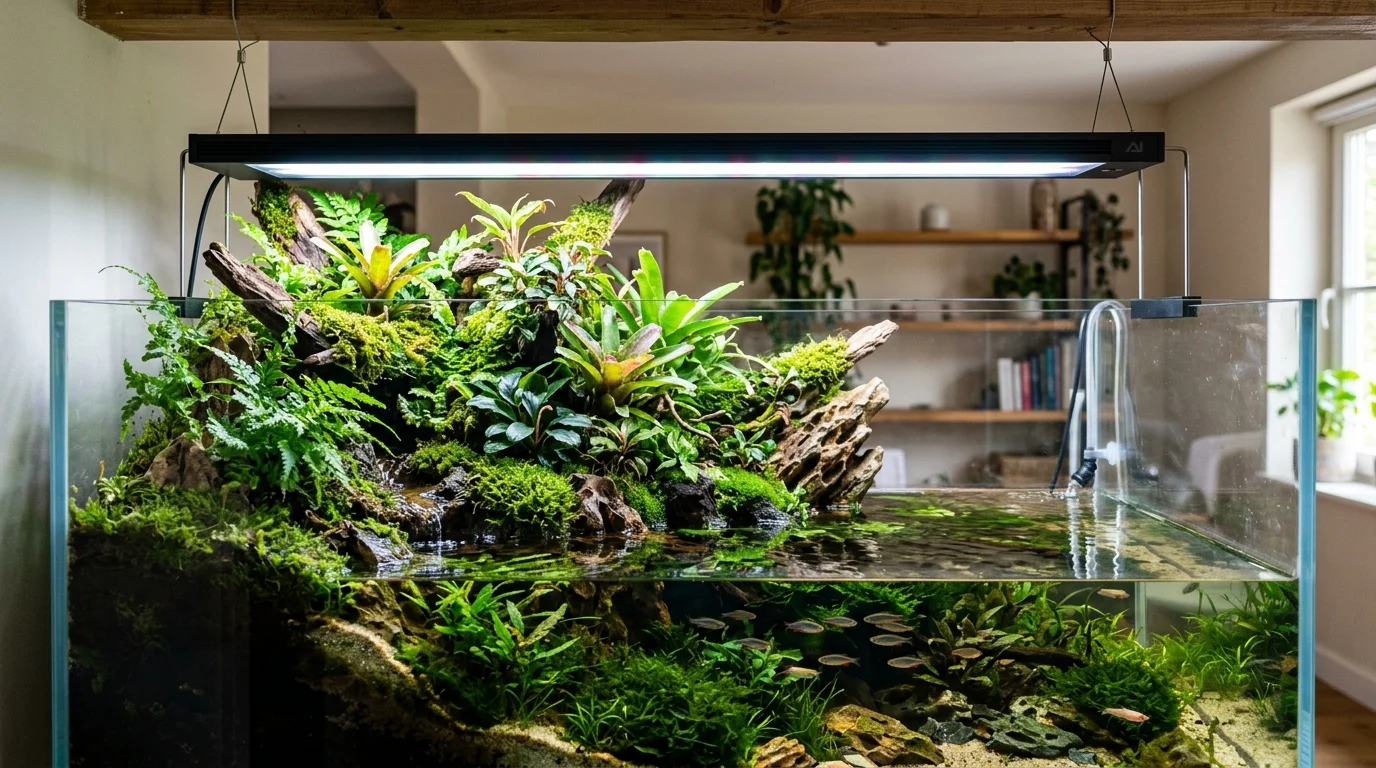
Paludarium lighting should be engineered around plant-level PAR, not wattage or Kelvin alone. Use 30–50 µmol/m²/s for low-light zones, 50–90 for medium zones and 100–150+ for demanding high-light positions. Start new systems at about 6 continuous hours for 3–4 weeks and move toward a stable 7–8 hour baseline. Fixture height, condensation, water depth and tannin or surface coverage can materially change delivered PAR, while lighting heat can increase evaporation enough to affect a shallow pump reserve.
Quick Answer
Set paludarium lighting by plant-level PAR rather than fixture wattage or color temperature alone. A practical starting matrix is 30–50 µmol/m²/s for low-light plants, 50–90 µmol/m²/s for medium-light plants and 100–150+ µmol/m²/s for high-light plants. Start a new enclosure at about 6 hours of continuous light for the first 3–4 weeks, then move toward a stable 7–8 hour baseline as plants establish. Measure or compensate for fixture height, glass condition, water depth and hardscape shadows, and monitor heat because increased evaporation can reduce a shallow aquatic reserve to the pump-safe minimum.
Key Takeaways
- Target PAR at the actual plant position: 30–50 µmol/m²/s for low light, 50–90 for medium light and 100–150+ for demanding high-light zones.
- Run a new paludarium at about 6 continuous hours for the first 3–4 weeks, then use a stable 7–8 hour baseline rather than extending duration to compensate for weak intensity.
- Treat fixture height, condensation, water depth and hardscape as optical losses: dirty or wet covers and deep or tannin-rich water can materially reduce delivered PAR.
- Control lighting heat as part of the hydraulic system because higher enclosure temperature and surface agitation can increase evaporation and expose a shallow pump intake.
How Much Light Does a Paludarium Need?
Build the lighting system around PAR at the plant rather than fixture wattage, lumens or a marketing label such as full spectrum. PAR measures photosynthetically active photons reaching the plant, so it is the most useful common measurement for comparing lighting intensity. Aquarium lighting references commonly use plant-level PAR bands rather than watts-per-volume rules, and the same principle is useful in a mixed paludarium.
For a practical starting point, use three working tiers:
| PAR Tier | Leaf-Level Target | Representative Plants | Best Placement |
|---|---|---|---|
| Low light | 30–50 µmol/m²/s | Java Moss, Christmas Moss, Anubias nana, Microsorum pteropus (Java Fern) | Deep aquatic zones, root overhangs and lower false-bottom ledges |
| Medium light | 50–90 µmol/m²/s | Cryptocoryne wendtii, Fittonia albivenis, Bucephalandra, Marcgravia, Selaginella | Transition shelves, marginal zones and mid-level background hardscape |
| High light | 100–150+ µmol/m²/s | Miniature Neoregelia bromeliads, terrestrial moss carpets, Ludwigia, Rotala | Upper emersed branches and exposed areas directly beneath suitable optics |
These are working design bands, not species guarantees. The aquatic portion is closely aligned with established planted-aquarium guidance: shade plants commonly operate around 20–40 PAR, medium planting around 40–90 and high-demand plants around 90–150 or more. Plant response still depends on carbon availability, nutrients, temperature, acclimation and water quality. [oaicite:1]{index=1}
Paludarium PAR Target Matrix
The practical mistake is to ask for one PAR number for the whole enclosure. A paludarium is vertically stratified. The upper canopy, transition shelf and submerged substrate can each have different light requirements.
| Zone | Target PAR | Use | Primary Risk |
|---|---|---|---|
| Low-light aquatic | 30–50 | Mosses, Anubias nana, Java Fern | Excess light on slow-growing foliage can increase algae pressure |
| Medium transition | 50–90 | Crypts, Fittonia, Bucephalandra, Marcgravia, Selaginella | Hardscape shadows create uneven exposure |
| High emersed | 100–150+ | Small bromeliads, demanding moss carpets and high-light aquatic stems | Heat, evaporation and algae become harder to control |
Use the paludarium plants guide to match individual plants to these zones rather than forcing every species into the same light field.
Why PAR Must Be Measured at the Plant
Fixture wattage tells you electrical consumption, not the amount of usable light reaching a leaf. Lumens describe brightness according to human vision and are not a direct plant-light measurement. The useful question is therefore: what PAR reaches this plant at its actual height?
For a complex paludarium, take representative measurements at the upper canopy, transition shelf and aquatic planting level. If a PAR meter is unavailable, use the manufacturer's PAR map at the specified mounting height as a planning reference, then adjust conservatively for enclosure geometry and optical losses.
Fixture
↓
Upper emersed canopy → target PAR at leaf level
↓
Transition shelf → intermediate PAR
↓
Water surface
↓
Submerged plant → account for water depth and optical loss
Terrestrial vs Submerged PAR
Do not transfer an air-measured fixture specification directly to the submerged planting zone. Light interacts with the enclosure cover, air-water interface, water and suspended material before reaching submerged tissue. Aquarium-light testing also demonstrates that measurements taken in air and underwater are not interchangeable because reflection and refraction change the measured field. [oaicite:2]{index=2}
| Lighting Path | Main Loss or Distortion | Design Response |
|---|---|---|
| Fixture to emersed leaf | Distance, optics and cover condition | Measure PAR at canopy level |
| Fixture to transition shelf | Hardscape shadows and oblique angles | Check multiple positions |
| Fixture to submerged plant | Water depth, surface reflection and water clarity | Measure or conservatively estimate at plant level |
| Fixture to rear vertical wall | Angle and self-shadowing | Angle or reposition the fixture |
Optical Decay: Glass, Condensation and Water
A paludarium can lose useful light before the photons reach the plant. Treat every optical layer as part of the lighting system.
A clean, dry glass or acrylic cover is usually a relatively small loss compared with a heavily obstructed cover, but the exact transmission depends on material, thickness, coatings and incidence angle. For field planning, an 8–12% allowance for a clean dry cover is a practical conservative budgeting figure rather than a universal material constant.
Condensation and mineral deposits deserve more attention. Published wet-glass measurements have shown condensate-related transmission reductions reaching roughly 13–15% under tested conditions, while the real penalty in a hobby enclosure can vary with droplet coverage, mineral deposits, angle and the material itself. Therefore, a 25–40% design penalty should be treated as a conservative dirty-cover troubleshooting allowance, not as a universal measured loss. [oaicite:3]{index=3}
In other words, if a light appears adequate on paper but the plants receive unexpectedly weak PAR, inspect the lid before buying a stronger fixture.
| Optical Condition | Planning Allowance | Interpretation |
|---|---|---|
| Clean dry glass | Approximately 8–12% | Conservative planning allowance; actual material transmission varies |
| Condensation or mineral deposits | 25–40% troubleshooting penalty | Use as a conservative dirty-cover allowance, not a universal laboratory constant |
| Clear water | Approximately 10–15% per 10 cm as a hobby planning heuristic | Actual attenuation depends strongly on water quality and optical properties |
| Tannin-rich or heavily covered water | 40%+ total loss can occur | Treat as a high-attenuation condition and verify with plant-level measurement |
Water-Column Attenuation
Water does not impose one fixed percentage loss per centimeter. Attenuation depends on absorption and scattering from water, dissolved organic matter, particles, algae and surface conditions. In practical paludarium planning, however, an approximate 10–15% PAR reduction per 10 cm of clear water can be used as a conservative hobbyist rule of thumb, provided it is not presented as a physical constant.
Blackwater conditions can be substantially more restrictive because dissolved organic matter absorbs light. Duckweed, floating plants, surface film and suspended particles can also block the direct optical path. A shallow clear basin may therefore deliver considerably more light to submerged plants than a visually similar tannin-rich or heavily covered basin.
Estimated submerged PAR
= Surface PAR × transmission factors

Example planning model:
Surface PAR = 80
10 cm clear-water allowance = 0.85
Estimated plant-level PAR ≈ 80 × 0.85 = 68
The example is a planning estimate, not a replacement for underwater PAR measurement.
How High Should a Paludarium Light Be Mounted?
Fixture height changes both intensity and coverage. Lowering a fixture generally raises PAR directly beneath it but can create hotspots. Raising it spreads light more broadly but reduces plant-level intensity.
| Fixture Position | Likely Result | Use When |
|---|---|---|
| Close to canopy | High central PAR | High-light upper plants need intensity and coverage remains acceptable |
| Moderately elevated | More even spread | Mixed plant zones need a smoother gradient |
| High above enclosure | Lower peak PAR | Hotspots or excessive intensity need control |
| Angled toward rear hardscape | Improved vertical illumination | Rear planting wall is heavily shadowed |
Use elevation as an engineering control. If the central canopy measures 150 PAR but the rear shelf measures only 35 PAR, changing spectrum will not fix the coverage problem. Move, raise, widen or supplement the optical field.
6500K Daylight vs Plant-Focused Red and Blue Spectrum
A 6500K daylight-style fixture can be a useful visual and horticultural starting point for a mixed paludarium, but Kelvin is a color-description metric rather than a PAR target. Plant-focused RGB fixtures can provide strong visual color rendering and useful red and blue output, but the spectrum does not compensate for insufficient photon delivery.
The 2Hr Aquarist likewise recommends evaluating PAR rather than relying on labels such as full spectrum, while noting that RGB-heavy fixtures can improve visual presentation of aquatic plant colors. [oaicite:4]{index=4}
| Approach | Strength | Limitation |
|---|---|---|
| 6500K-style broad daylight | Natural-looking mixed enclosure illumination | Kelvin does not specify delivered PAR |
| Broad white with RGB supplementation | Good plant color rendering and flexible appearance | Still must be evaluated by plant-level PAR |
| Strong red/blue emphasis | Can provide photosynthetically useful wavelengths | Visual appearance may be less natural |
| Decorative low-output lighting | Viewing and accent effects | May not provide sufficient PAR for sustained growth |
Photoperiod Protocol
Use a timer and keep the daily schedule consistent. Current planted-aquarium guidance commonly starts new systems around 6–8 hours and established systems around 7–8 hours, with longer periods possible only when plant mass, carbon availability and maintenance support the additional light exposure. Aquarium Co-Op recommends 6–8 hours for newly planted aquariums and increasing duration gradually if the system remains stable; The 2Hr Aquarist also recommends a fixed 7–8 hour low-tech baseline. [oaicite:5]{index=5}
| Paludarium Stage | Continuous Photoperiod | Purpose |
|---|---|---|
| First 3–4 weeks | 6 hours | Run-in period while emersed plants acclimate and biological conditions stabilize |
| Established mixed system | 7–8 hours | Practical baseline for routine plant growth and algae control |
| Higher-demand system | 7–8 hours initially | Increase only after PAR, plant response, carbon and heat are controlled |
The 6-hour run-in is deliberately conservative. It does not guarantee that algae will be absent, but it reduces total daily light exposure while new plants establish. If growth is strong and algae remains controlled, move toward the 7–8 hour baseline rather than making a large jump.
The 4h ON – 2h OFF – 4h ON Siesta Regimen
The siesta schedule splits the daily illumination into two blocks:
4 hours ON
↓
2 hours OFF
↓
4 hours ON
This method is widely used by hobbyists and is also described in aquarium lighting guidance as an optional afternoon break. The proposed mechanism in a low-tech basin is that the dark interval reduces active photosynthesis and allows dissolved CO2 to recover before the second lighting block. The practical benefit is strongest when a paludarium contains a meaningful aquatic low-tech zone without injected CO2.
Do not treat the siesta as a proven algae-killing mechanism. Evidence for selective algae suppression is limited and community experience is mixed. It also does not magically reduce the total light dose if the two blocks still deliver eight hours of illumination. Its strongest practical advantage is schedule flexibility and, in some low-tech systems, allowing carbon conditions to recover. [oaicite:6]{index=6}
| Schedule | Best Use | Trade-Off |
|---|---|---|
| 6 hours continuous | New enclosure run-in | Shorter viewing window |
| 7–8 hours continuous | Established baseline | Simple and easy to troubleshoot |
| 4h ON → 2h OFF → 4h ON | Low-tech mixed systems or split viewing times | Does not guarantee algae suppression and adds another variable |
Lighting Heat and Evaporation
Light intensity is also a thermal variable. Increasing fixture output can increase enclosure heating, and higher temperature can increase evaporation. In a paludarium this matters because the aquatic zone may contain only a small pump-safe reserve.
The correct response is not to ignore the thermal effect until the pump begins ingesting air. Monitor the enclosure after the light reaches its normal operating temperature and compare the normal water level with the minimum pump-safe level defined by the filter and pump system.
See the paludarium filter and pump guide for pump-safe water levels, intake protection and circulation-system considerations.
Calculate the Evaporation Buffer
For a simple water-level reserve calculation, use:
Evaporation buffer (L) = A × D
A = exposed water surface area in m²
D = allowable water-level drop in mm
1 m² × 1 mm = 1 L
Example:
A = 0.25 m²
D = 20 mm
Buffer = 0.25 × 20
Buffer = 5 L
This tells you how much water corresponds to the allowed level drop; it does not predict how many days the enclosure will take to lose that amount. Waterfall movement, ventilation, humidity, temperature, lighting heat and exposed surface area all affect the actual evaporation rate.
Use the Paludarium Water Volume Calculator to establish the aquatic reserve before deciding how much thermal load the lighting system can safely introduce.
Lighting and Pump-Safe Water Levels
Define three water levels:
- Maximum: the highest safe operating level below overflow and electrical-equipment limits.
- Normal: the target level after routine top-off.
- Minimum pump-safe: the lowest level at which the actual intake remains completely submerged and stable.
The minimum level is determined by the pump intake geometry, not by the enclosure's nominal dimensions. If lighting and evaporation can move the water from normal to minimum rapidly, increase the reserve, reduce thermal load, improve ventilation or add appropriate top-off monitoring.
Algae Control: Intensity Before Duration
When algae appears, do not automatically add more hours or switch spectrum. First check whether plant-level PAR is excessive for the available carbon, nutrients and plant mass. The 2Hr Aquarist specifically emphasizes that stronger light narrows the maintenance margin and that high PAR without adequate carbon control can increase algae pressure rather than plant growth. [oaicite:7]{index=7}
| Observed Problem | First Check | Practical Adjustment |
|---|---|---|
| Algae on slow-growing Anubias or Bucephalandra | PAR at leaf level | Reduce intensity, increase shade or reposition plant |
| Weak upper growth | PAR at canopy | Raise output or reduce fixture height if heat permits |
| Dark rear shelf | Coverage and hardscape shadow | Reposition or widen the light field |
| Rapid water loss | Fixture heat and exposed surface | Reduce thermal load and monitor water reserve |
| Algae after increasing duration | Total daily light dose | Return to 6–8 hours and reassess intensity |
Paludarium Lighting Setup Sequence
- Map the terrestrial, transition and aquatic zones.
- Assign each plant group to a low, medium or high PAR zone.
- Choose a fixture based on PAR output and coverage rather than wattage alone.
- Install the fixture at a height compatible with its published PAR data.
- Measure or estimate PAR at representative plant positions.
- Inspect the lid for condensation, mineral deposits and blocked optical paths.
- Account for water depth and water clarity in submerged zones.
- Run the new system at 6 continuous hours for the first 3–4 weeks.
- Move toward a stable 7–8 hour baseline once plant growth and algae are controlled.
- Monitor enclosure temperature and evaporation.
- Confirm that normal water level remains safely above the minimum pump-safe level.
- Recheck PAR after plants and hardscape mature because self-shading changes the lighting field.
Final Paludarium Lighting Rule
Set the light by plant-level PAR, control the daily dose with a consistent photoperiod, and treat optical losses and thermal load as part of the same engineering problem. A strong fixture is useful only when its photons reach the intended leaves without creating excessive hotspots, algae pressure, heat or evaporation that destabilizes the aquatic system.
Frequently Asked Questions
What PAR should I use for a paludarium?
Use 30–50 µmol/m²/s for low-light plants such as Java Moss, Christmas Moss, Anubias nana and Java Fern; 50–90 µmol/m²/s for medium-light plants such as Cryptocoryne, Fittonia, Bucephalandra, Marcgravia and Selaginella; and 100–150+ µmol/m²/s for high-light zones containing demanding plants such as miniature Neoregelia, terrestrial moss carpets, Ludwigia and Rotala. Treat these as starting design bands and adjust for the actual species, carbon availability and plant response.
How long should paludarium lights be on each day?
Start a newly built paludarium at about 6 continuous hours per day for the first 3–4 weeks. Once plants establish and algae remains controlled, move toward a consistent 7–8 hour daily baseline. Higher-light systems can require different settings, but increasing duration should follow stable PAR, plant growth, carbon availability and thermal control rather than compensate for insufficient fixture intensity.
How much PAR can condensation on a paludarium lid block?
The loss is highly dependent on the cover material, droplet coverage, mineral deposits and light angle. Published wet-glass testing found condensate-related reductions up to roughly 13–15% under tested conditions. For conservative paludarium troubleshooting, a 25–40% penalty can be used when a cover is heavily condensed or mineral-coated, but that range should not be treated as a universal measured constant.
Is 6500K better than a red-and-blue plant spectrum for a paludarium?
6500K describes the visual color characteristics of a daylight-style light; it does not specify PAR. A broad 6500K-style fixture can work very well for mixed paludariums, while RGB or plant-focused fixtures can provide stronger color rendering. Choose by plant-level PAR, coverage and heat first, then use spectrum and color rendering to refine the visual result.
Can paludarium lighting cause the water level to fall enough to damage a pump?
Yes. Lighting heat can increase evaporation, and waterfalls or strong surface agitation can increase water loss further. In a shallow basin, even a small absolute loss can expose an intake. Define maximum, normal and minimum pump-safe water levels, calculate the evaporation buffer from exposed area and allowable drop, and monitor the system after the light reaches its normal operating temperature.
Explore More
Related Articles
Related Plant Guides
No specific plant guides found matching this topic.
Recommended next actions
Continue Exploring
Dive deeper into related plant care tools and profiles.
Topic Guide
What Is a Paludarium? Design, Anatomy, and Ecosystem Setup
Learn what a paludarium is, how land and water zones work together, and how to plan drainage, circulation, substrate, planting, and maintenance.
Topic Guide
Paludarium Plants: Choosing Plants for Land & Water Zones
Learn how to choose paludarium plants by land, emergent, humid, and aquatic zones, with guidance on light, moisture, growth, and maintenance.
Topic Guide
Grow Lights
Learn everything about grow lights for your indoor and aquarium plants. Expert care tips, troubleshooting, and related guides.
Topic Guide
Low Light
Learn everything about low light for your indoor and aquarium plants. Expert care tips, troubleshooting, and related guides.
Topic Guide
Bright Indirect Light
Learn everything about bright indirect light for your indoor and aquarium plants. Expert care tips, troubleshooting, and related guides.
Topic Guide
Emersed vs Submerged Plants in a Paludarium
A practical guide to the physiological and morphological differences between emersed and submerged aquatic plants, including cuticles, stomata, leaf structure, gas exchange, transition shock, and humidity acclimation.